How to record drums at home | One mic to eight
How to record drums at home, step by step: the phone-on-a-shelf method, one mic, the two-mic Recorderman, the four-mic Glyn Johns and when eight is worth it.
Recording drums at home has a reputation. Ask a guitarist and they will tell you it is the one thing you cannot do in a bedroom. Ask an engineer and they will start listing microphones.
Both are wrong, or at least out of date. Drums are harder to record than a guitar because there are more of them, and because the room matters. But a drummer with one microphone and a tuned kit can get a recording that sounds like a record, as long as the microphone is in the right place.
So that is how this guide works. We start with no mics at all and add one at a time, and every step is a complete setup you could stop at. Let’s find out how far each one gets you.
Before you plug anything in
Three things decide more of your drum sound than any microphone, and all three are free.
Tune the kit. A badly tuned kit records as a badly tuned kit, only louder. Our drum tuner gets every lug matched in a few minutes. Pay special attention to the snare’s resonant head, which is where buzz lives, and to the kick, which wants a little less tension than you think.
Dampen on purpose. Studio drums ring less than live drums because a microphone hears every overtone. A strip of gaffer tape or a dampening gel on the snare, a pillow touching the kick’s batter head, and tape on any tom that rings for longer than a second. Less is more: you can always add room in the mix, you can never take it out.
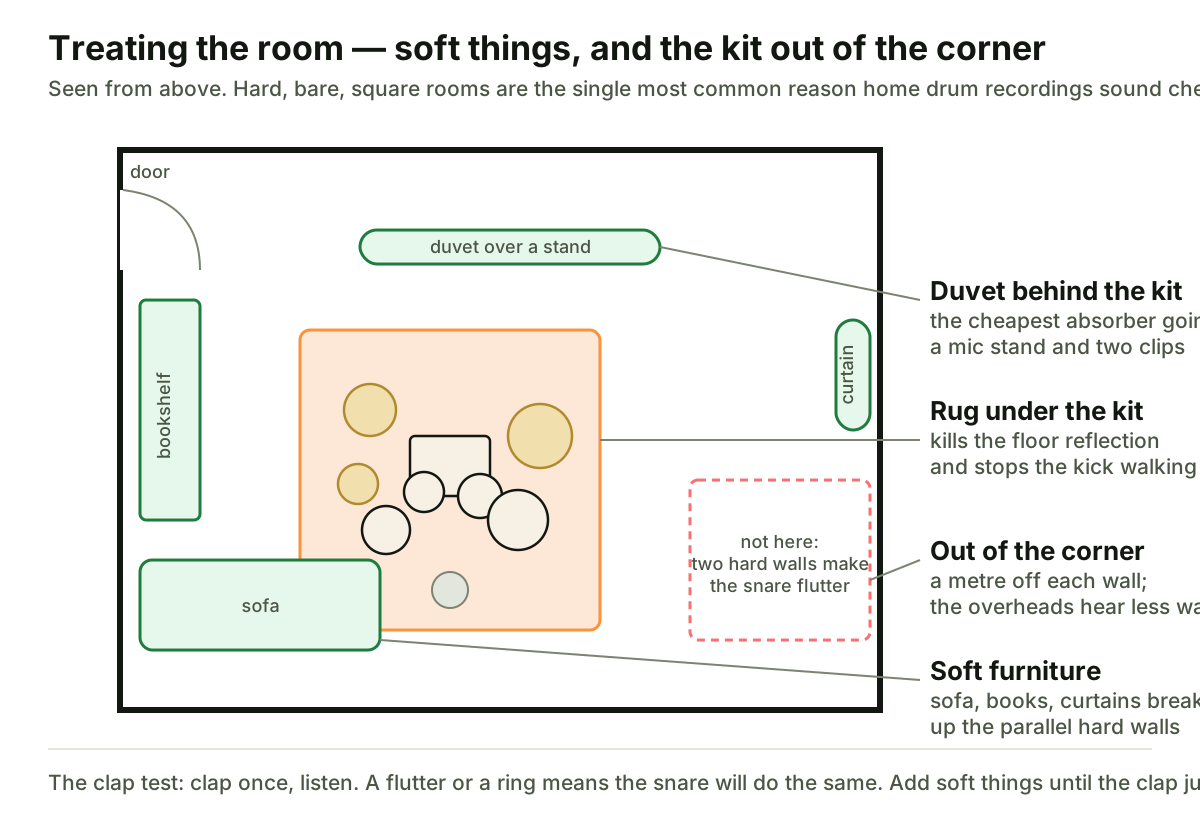
Listen to the room. Clap once and listen. If the clap flutters, so will your snare. Rugs, a sofa, bookshelves and a duvet over a stand all help. Hard floors and bare walls in a small square room are the worst case, and the single most common reason home drum recordings sound cheap.
Level zero: a phone on a shelf
No mics, no interface, no excuses. Your phone records audio well enough that placement is the whole game.
Put it a metre or two in front of the kit, roughly at your chest height, slightly off to the hi-hat side so the kick is not firing straight into it. Record video. The built-in limiter will squash the loud hits, which is fine for a clip.
Then drop the clip into Drum Filters. It levels the audio, adds the EQ and compression a mixed drum track gets, and puts a room around it. For a clip of your playing, that is the whole job done. It is not a recording you would put on an album. It is a recording you would put on your profile.
Level one: one microphone
One mic changes two things: you get to choose where it is, and you get a clean signal with no phone limiter in the way.
The classic one-mic placement is above and in front of the kit, about shoulder height to a standing person, pointing down at the snare. From there it hears the whole kit in roughly the balance you hear it. Move it closer to the kick for more thump, higher for more cymbal.
Which mic? A large-diaphragm condenser is the usual answer and an Audio-Technica AT2020 does the job for very little money. A Shure SM57 will do it too, and you will own one anyway by the end of this guide. Either way you need one input on an audio interface, and a Focusrite Scarlett Solo or 2i2 is the standard answer to that.
Mono, one mic, done well, is how a lot of early rock and roll was recorded. It is a legitimate sound, not a compromise.
Level two: two mics, the Recorderman way
With two mics you can go stereo, and the trick is to do it without the kit sounding lopsided.
The Recorderman technique: one mic directly above the snare, about two stick lengths up. The second over your right shoulder, pointing at the snare, at the same distance from the snare as the first. Check the distance from the kick beater too, and adjust until both mics are the same distance from both the snare and the kick. A piece of string makes this easy.
Pan them left and right and the snare and kick sit dead centre, the toms spread naturally, and the cymbals wrap round the sides. Two matched small-diaphragm condensers like a pair of Rode M5s are the budget choice; a pair of Shure SM81s is the one you will never need to replace.
Add a kick mic at this stage if you have a third input. The kick is the drum that most wants its own microphone.
Level three: four mics, the Glyn Johns way
This is the one. Four microphones, a sound that has been on records since 1969, and the point where most home drummers should stop buying mics for a while.
The setup:
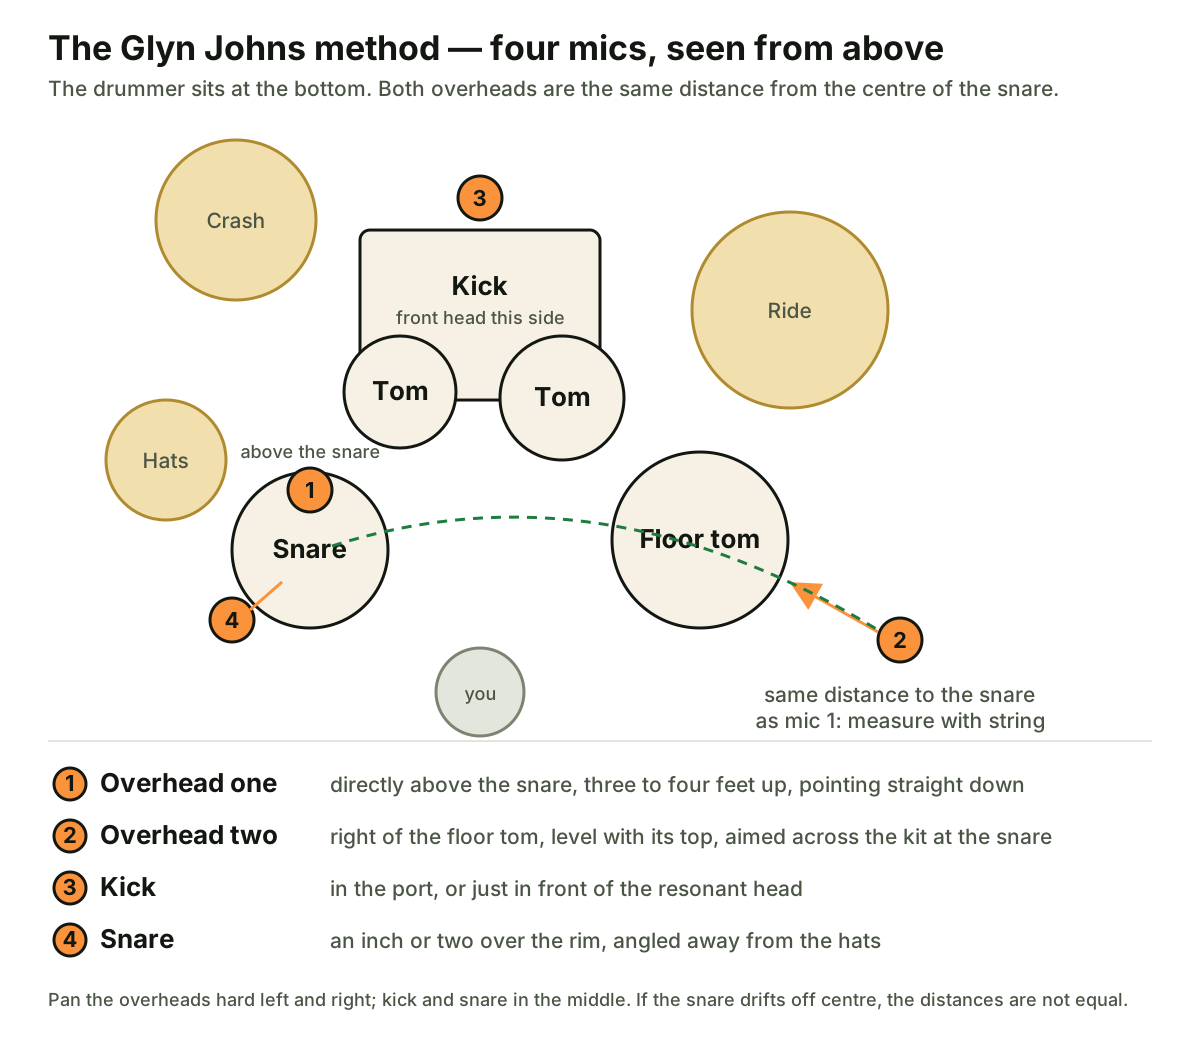
- Overhead one directly above the snare, three to four feet up, pointing straight down.
- Overhead two to the right of the floor tom, about level with the top of the floor tom, pointing across the kit at the snare. Measure it: it must be exactly the same distance from the snare as overhead one, or the snare drifts off centre and the two mics start cancelling each other.
- Kick mic inside the port hole, or just in front of the resonant head if there is no port, a few inches back from the batter.
- Snare mic an inch or two over the rim, pointing at the centre of the head, angled away from the hi-hat.
Pan the overheads hard left and right. Put the kick and snare in the middle. That is a finished drum sound. The overheads carry the kit, the close mics add weight where you need it. Our first four mics guide covers exactly which four to buy for this.
You need four inputs for this, which means stepping up from the two-input interfaces. The audio interface guide covers the jump.
Level four: close-mike everything
Eight channels and up: kick in and out, snare top and bottom, a mic on every tom, overheads, a room pair. This is how most modern rock and metal records are made, and it gives you control over every drum in the mix.
It is also where most home recordings get worse before they get better. More mics means more bleed, more phase problems and more decisions. If your four-mic recording sounds good, add toms one at a time and check that each new mic is making the mix better, not just louder.
Two tips that save hours. Flip the polarity on the snare bottom mic. And when you add a tom mic, mute it and unmute it while the overheads play: the tom should get fuller, not thinner. If it gets thinner, move the mic.
Hearing it back
Whatever level you record at, mix on headphones that tell you the truth. Our headphones guide is written for e-kits but the same closed-back studio models are what you want here.
And whatever level you record at, protect your ears while you track. A kit in a small room with the door shut is louder than the same kit on a stage. The hearing protection guide has the options.
Where can I buy the gear?
The right shop depends on where you are: Guitar Center in the Americas, Gear4music in the UK, or Thomann for Europe and the rest of the world.
For a lot of this gear, used is the smart buy. Microphones last decades and a second-hand SM57 on Reverb is the same mic it was when it was new.
Final thoughts
The best drum recording setup is the one you will actually use, and that is usually smaller than you think. One mic in the right place beats eight in the wrong ones, and a tuned, dampened kit in a treated room beats an expensive one in a bare box.
Start at the level you can afford, record something every week, and move up when you can hear what the next mic would fix. Then film the best take and give it to Drum Filters for your profile — the recording and the clip are two different jobs, and you can be good at both.
Recording drums at home FAQs
- How many mics do you need to record drums?
- One, to start. A single large-diaphragm condenser or even a decent dynamic in the right spot records a usable kit, and plenty of classic records used two or three. Four — kick, snare and a pair of overheads — is the point where most home recordings stop sounding like a demo. Eight is for when you want to mix each drum separately.
- What is the cheapest way to record drums?
- Your phone, placed well. Put it a metre or two in front of the kit at chest height, away from the kick's direct blast, and record video. Then run the clip through Drum Filters, which does the EQ, compression and room work in a tap. It will not replace a miked recording, but for sharing your playing it is better than most people's first mic setup.
- What is the Glyn Johns method?
- A four-mic technique named after the engineer who used it on Led Zeppelin and The Who. One overhead directly above the snare, a second to the right of the floor tom pointing across the kit at the snare, both exactly the same distance from the snare so the snare sits in the middle of the stereo picture, plus a kick mic and usually a snare mic. It gives a big, natural kit sound from very little gear.
- Do I need an audio interface to record drums?
- For anything beyond a phone or a USB mic, yes. The interface turns the mics' signals into audio your computer can record, and the number of mic preamps it has is the number of mics you can use at once. Two inputs covers a stereo pair; four covers Glyn Johns with a kick and snare; eight covers a fully close-miked kit.
Keep reading

All Our Buying Guides
Audio interfaces for drums | How many inputs?
Which audio interface to buy for recording drums: how many mic inputs you need, the two- and eight-input standards, ADAT expansion and the e-kit case.

All Our Buying Guides
Drum VSTs | The best sounds for your e-kit
The best drum VSTs for an electronic kit: Superior Drummer 3, EZdrummer 3, Addictive Drums 2, GetGood Drums and Steven Slate Drums compared, plus the free ones.

How to
Connect an e-kit to a computer | USB, MIDI, latency
How to connect an electronic drum kit to a computer: the USB cable, MIDI versus audio, the buffer and driver settings that kill latency, and mapping the pads.