Connect an e-kit to a computer | USB, MIDI, latency
How to connect an electronic drum kit to a computer: the USB cable, MIDI versus audio, the buffer and driver settings that kill latency, and mapping the pads.
The module that came with your electronic kit has sounds in it. They are fine. They are also the reason people say electronic drums sound electronic.
Plug the kit into a computer and the sounds come from a drum VST instead — real kits, recorded in real rooms, with more detail than any module can hold. It is the single biggest upgrade an e-kit can get, and it costs a cable.
The catch is latency, and latency is a settings problem. So let’s connect the kit, kill the delay and map the pads, in that order.
What goes down the cable
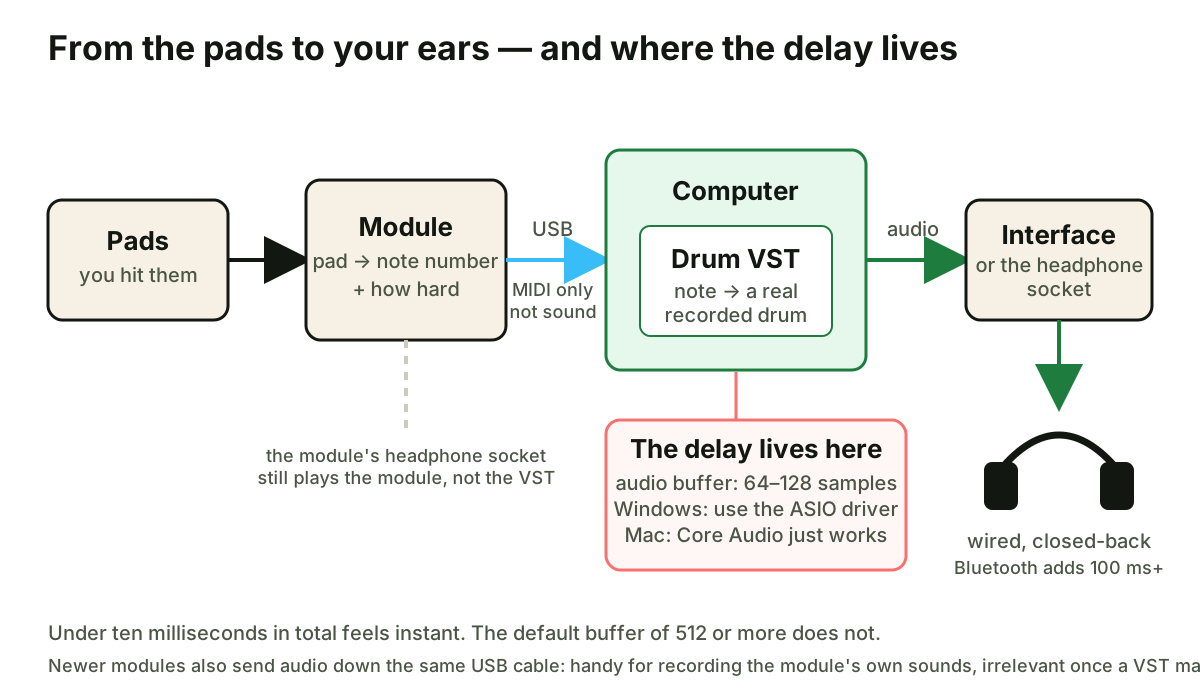
Your module can send two things to a computer: MIDI and audio.
MIDI is instructions. “Snare, this hard, now.” The computer turns those instructions into sound using whatever drum software you point them at. This is what you want for VSTs, and every USB-equipped module can do it.
Audio is the module’s own sounds, as sound. Useful for recording what the module makes, pointless if you are replacing it with a VST. Newer modules send audio over USB alongside the MIDI; older ones only do it through their line outputs.
For the VST route, which is the one worth taking, you only need the MIDI.
Step one: the cable
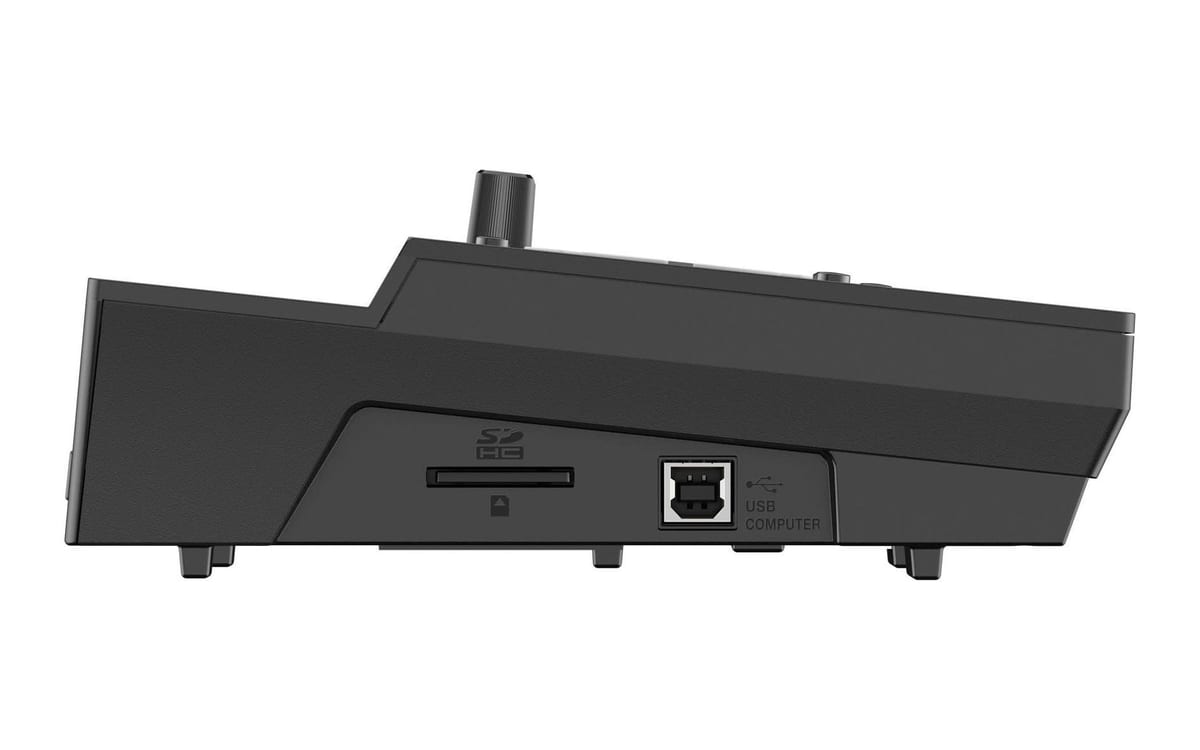
Almost every module made in the last ten years has a USB socket, usually the square USB-B type. One USB-B to USB-A cable connects it to a computer; add a USB-C adapter if your laptop has nothing else. The module turns up as a MIDI device with no driver to install on a Mac, and on Windows most modern modules are the same.
If your module only has five-pin MIDI sockets, a USB-MIDI interface cable does the same job for the price of a set of sticks. Plug MIDI Out on the module into MIDI In on the cable.
Our electronic drum kit buying guide flags which kits have USB and which only have MIDI, if you are still choosing.
Step two: the software
You need something to receive the MIDI and make sound from it. Two options:
A drum VST running on its own. Superior Drummer, EZdrummer, Addictive Drums and the rest all run standalone, with no DAW. Open the app, pick the module as the MIDI input, hit a pad. This is the simplest setup and the one to start with.
A DAW with the VST inside it. Logic, Reaper, Ableton, Cubase, GarageBand. The same VST sits on a track, and you can record the MIDI, fix the mistakes and mix the result. This is where you end up once you want to record.
The drum VST guide covers which software to pick. Any of them does the next part the same way.
Step three: kill the latency
This is the step that decides whether the kit feels like a drum kit or like a video call. The delay between hitting a pad and hearing the sound is latency, and it comes from the audio buffer: the chunk of sound the computer prepares in advance.
Set the buffer small. In the software’s audio settings, find the buffer size and set it to 128 samples. If the audio stays clean, try 64. At 44.1kHz, 128 samples is about 3 milliseconds each way, and under ten in total is the point where you stop noticing.
Use the right driver. On a Mac, Core Audio just works. On Windows, you need an ASIO driver: the one that came with your audio interface if you have one, or ASIO4ALL if you are running through the laptop’s own headphone socket. The generic Windows drivers add tens of milliseconds and there is no setting that fixes that.
Close everything else. Browsers with video playing, chat apps, anything with a notification sound. They all fight for the audio device.
Headphones from the computer, not the module. Once the VST is making the sound, the module’s headphone socket is playing the module. Plug into the computer, or into an audio interface on the computer. The headphones guide explains why wired is not optional here.
If you still hear a delay after that, the usual culprit is a USB hub. Plug the module straight into the computer.
Step four: map the pads
Every pad sends a note number. The VST needs to know what each number means, and this is where it feels broken for the first ten minutes.
Start with the preset. Superior Drummer, EZdrummer and Addictive Drums all have maps for Roland, Alesis and Yamaha modules that get the kick, snare, toms and cymbals right. Pick yours.
Then fix what is left with the learn function. Hit the rim of the snare, and if the software plays a tom, click the snare rim in the software, hit learn, hit the rim again. Repeat for anything wrong. Five minutes.
The hi-hat is the exception. It sends the pad note plus a controller message for how open the pedal is, and the VST has a separate setting for that. Roland and Alesis send it as CC4, which the presets expect. If the hat is stuck open or stuck closed, this is the setting.
Velocity is the other thing worth a minute. If the quiet hits are inaudible and the loud ones are all the same, the VST has a velocity curve setting. Flatten it until a ghost note and a rimshot sound like they do on a real snare.
Recording the kit
Once the kit plays through the VST with no delay, recording is a track in your DAW with the VST on it and the module as its MIDI input. You record the MIDI, not the audio, which means every hit is editable afterwards: move a late kick, fix a flam, change the entire kit sound after the fact.
The module’s audio outputs still have a use: recording the module’s sound as a safety alongside the MIDI. The audio interface guide covers that, and it covers the interface that will also give you a better headphone amp and a quicker driver than the module does.
Where can I buy the bits?
The right shop depends on where you are: Guitar Center in the Americas, Gear4music in the UK, or Thomann for Europe and the rest of the world.
Final thoughts
A USB cable, a buffer set to 128, the right driver, the right preset. That is the whole job, and it is the difference between a kit that sounds like a module and a kit that sounds like a record.
Do it on a quiet evening rather than ten minutes before a session, because the first time through takes an hour and every time after takes none. Then go and pick the sounds — that is the fun bit.
E-kit to computer FAQs
- How do I connect my electronic drums to my computer?
- With the USB cable, in almost every case. Modules from the last decade or so — Roland TD series, Alesis Nitro and Strata, Yamaha DTX — are class-compliant USB MIDI devices, so a USB-B to USB-A cable (or the right adapter for your laptop) is the whole connection. Older modules with only five-pin MIDI sockets need a cheap USB-MIDI cable.
- Why is there a delay when I play my e-kit through my computer?
- Latency, and it is a settings problem, not a hardware one. Set the audio buffer in your DAW or drum software to 64 or 128 samples, use the ASIO driver on Windows (your interface's own, or ASIO4ALL if you have no interface), and close anything else that uses audio. Under ten milliseconds feels instant; the default buffer of 512 or more does not.
- Does my electronic drum module send audio over USB?
- The newer ones do. Roland's TD-17 and above, the Alesis Strata and most recent Yamaha modules send audio and MIDI over the same cable, so you can record the module's own sounds without an interface. Older and cheaper modules send only MIDI over USB, so to record the module's sounds you take its line outputs into an audio interface.
- What is MIDI mapping for electronic drums?
- Telling the software which pad is which. Every pad sends a note number, and the drum VST needs to know that note 38 is your snare and note 36 is your kick. The big VSTs ship with presets for Roland, Alesis and Yamaha kits that get most of this right; the rest is a learn function where you hit a pad and tell the software what it was.
Keep reading
All Our Buying Guides
Audio interfaces for drums | How many inputs?
Which audio interface to buy for recording drums: how many mic inputs you need, the two- and eight-input standards, ADAT expansion and the e-kit case.
All Our Buying Guides
Drum VSTs | The best sounds for your e-kit
The best drum VSTs for an electronic kit: Superior Drummer 3, EZdrummer 3, Addictive Drums 2, GetGood Drums and Steven Slate Drums compared, plus the free ones.
Getting Started
Buying a drum kit for a child | A parent's guide
A parent's guide to a child's first drum kit: the right size by age, electronic or acoustic, the kits worth buying, noise, lessons and ear protection.